FreeLynx/LabLynx IP Configuration
Your computer’s optical Ethernet interface is preconfigured by Neuralynx. If it needs to be reconfigured, turn on the FreeLynx/LabLynx and then follow the configuration below:
- Right click the network icon from your task bar
![]()
- and click Open Network and Internet settings.
- Click on the Change adapter options setting below the Advanced network settings section
- Double click the active Ethernet icon that is not your local internet connection. This is typically an Intel PRO/1000, Intel i350, or Intel X710.
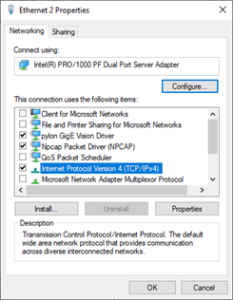
- Click Properties in the Ethernet Status window.
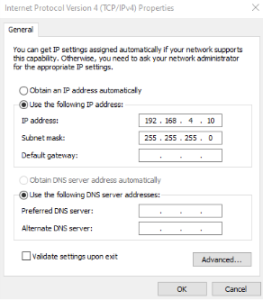
- Double click the Internet Protocol Version 4 (TCP/IPv4)
- Set the Ethernet interface IP address to 192.168.4.10
- Set the subnet mask to 255.255.255.0.
- Do not enter a gateway IP.
- Click OK
You will need to click OK on the Ethernet Properties window and then select the Properties button again from the Ethernet Status window, otherwise your previous settings will be removed.
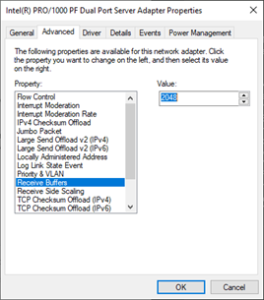
- Click the Configure… button near the upper right of the Ethernet Properties window.
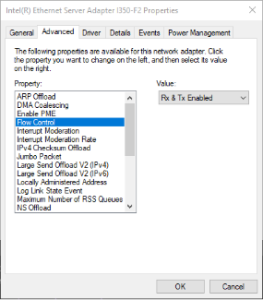
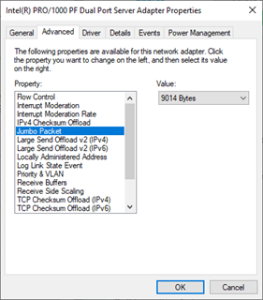
- In the advanced settings for your Ethernet interface, enable Flow Control, set Jumbo Packet to 9014 Bytes, and increase Receive Buffers to the maximum (typically 2048). Click OK and close the Ethernet Status window. No other changes are required. See images below.
- Click OK to close the current window and then close the remaining network windows.
The PC is now configured to connect to the FreeLynx/LabLynx through Cheetah. Be sure to allow Cheetah through the Windows firewall or disable the firewall altogether. Any 3rd party firewalls and virus software can also interfere with the communication between the FreeLynx/LabLynx and Cheetah.
Caution – Devices and software for investigational use in laboratory animals or other tests that do not involve human subjects.
Rev. A0