Neuralynx EIB Pins
From Space to Cactus Needles to Gold Pins:
After being selected as the #1 experiment for the 1998 NASA/NIH NeuroLab Space Shuttle “E-100: Rats in Space,” Dr. Bruce McNaughton realized we had to produce over 150 twelve-tetrode microdrives for astronaut training and launch schedule contingencies. This meant connecting over 7200 microwires! We found Silver Epoxy to be a mess, soldering not time effective, PC Board repair paint unreliable, and wire bonding not feasible because of the microwire polyimide insulation. The PCB (Printed Circuit Board) EIB via – a small, gold-plated hole through the board for attachment of the microwire – was already established. But we needed a consistent, high quality connection method that was fast and reliable.
After many connection attempt failures and an afternoon of pondering a viable method, Bruce and I were looking out the “NSMA workshop window” in Tucson, the cactus capital of the world. A potted cactus plant was on the windowsill, and we had our material! Cactus needles are tough and fibrous, yet small in diameter with the perfect taper to give increasingly massive pressure, clamping microwires securely in place and forcing electrical contact as the is inserted into the EIB via. The cactus needle solution led to many hours harvesting, oven drying, and counting thousands of tiny cactus needles.
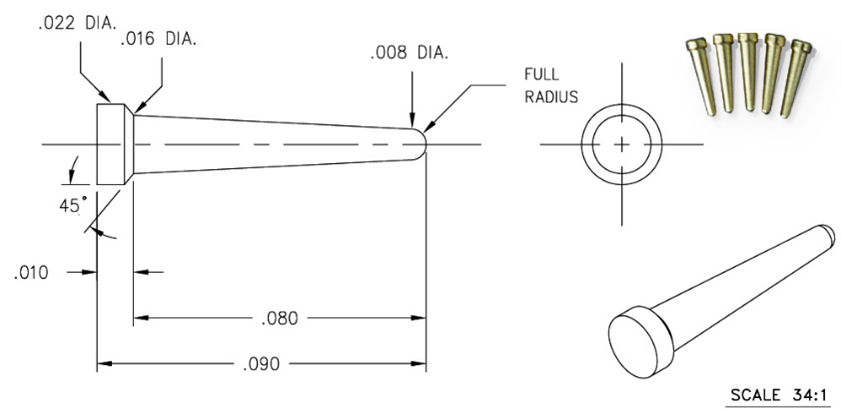
After empirically studying the key properties of cactus needles – what made them work so well – we improved upon the design with a non-organic solution: the Neuralynx gold EIB pins, which we produce in both Large and Small sizes for varying EIB via sizes. We found these pins simpler and more practical than threaded screw solutions.
Practical EIB Pins Usage – a Critical Connection!
The key for successful microwire-to-EIB connections is to 1) thread the microwire through the PCB Via and then 2) to insert the EIB Pin from the opposite side. If you thread the wire from the bottom, insert the EIB Pin from the top; the reverse will also work if it’s more convenient for your microdrive design.
Important Note: DO NOT insert the microwire and pin from the same side of the EIB! The EIB Pin is tapered (like the cactus needle) to create a pressure gradient between the contact surfaces of the microwire, EIB Pin and EIB Via – minimum at the EIB Pin tip and maximum at the large diameter “top.” If the microwire and EIB Pin are inserted in the same direction, the EIB Pin will pinch off the microwire at the surface of the EIB with no mechanical connection strength of the microwire. The microwire WILL detach from the EIB and Pin, severing the connection to the subject.
The microwire should be “pinched off” at the top of the PCB Via where the wire is deformed and the insulation is crushed. This is where the critical contact is made. The EIB Pin taper creates the pressure gradient that “holds and connects” the microwire to the via’s inside surface. When properly made, the connection will have both a perfect electrical connection and a strong mechanical connection. A 4.3 gram EIB-54-Kopf can be suspended by a single 12 µm Ni-Chrome wire when properly connected!
Special EIB Pin Tools are the best solution for inserting and applying opposing pressure to the underside of the EIB and the head of the EIB Pin. The bottom jaw of the pliers are recessed to grab the EIB edge and avoid microwire damage. With this tool, pressure is gradually increased until the microwire is pinched off. The remaining wire is easily removed with forceps.
Final Notes:
Can EIBs and EIB Pins be reused? EIBs may be reused once but the pressure during pinning will crack the plated via surface. “Murphy’s Law” ensures the microwire will be positioned in a crack causing a poor connection. EIB pins should not be reused because the crimping pressure will deform the pin’s gold-plated surface, making future connections less predictable and reliable.
Neuralynx offers both Large and Small EIB pins with different diameters. We designed our EIBs with two different via diameters based on the density of connections. Make sure you use the proper size pins for the EIB on your microdrive. If you make your own custom EIBs, contact us for proper via sizes. Note that most PCB fabricators do not worry about finished via diameter because the purpose is to simply get a connection from one layer to another on the PCB. Make sure you specify to the PCB fabricator the desired diameter and tolerance for good results. Neuralynx has changed from lead solder to gold-plated EIB board finishes. Lead solder is now prohibited by ROHS, and new solder options are not as consistent as gold-plating.
Caution – Device for investigational use in laboratory animals or other tests that do not involve human subjects.
Rev. A0